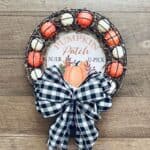
Fall Pumpkin Patch Wreath
Spruce up your home for the fall season with this easy fall pumpkin patch wreath craft. Supplies are purchased at your local Dollar Tree store making it an affordable fall wreath.
Yield: 1 wreath
Cost: $10
Materials
- 2 14-inch dollar tree wire wreath forms
- 1 pkg of Dollar Tree decorative brown shred
- 4 black zip ties
- 2 packages of small pumpkins (one package of white, one package of orange)
- 1 Pumpkin patch faux wood sign
- Hot Glue Gun to help secure the sign
Instructions
- Flip one of the wire wreath forms over so the rounded top section is on the bottom. This is going to be the start of the pumpkin “cage”.
- Add a layer of the decorative shred to the wire wreath. You don’t need very much, we used less than half of the bag. Once you add your layer you can set it aside and put it away for another project.
- Next, we are going to place the pumpkins on top of the decorative shred. If your pumpkin came on a skewer, pull them off the skewer and place them. For this wreath, we alternated the colors, but you can place them however you like.
- After you have the decorative shred and pumpkins in place, place the 2nd wire wreath form on top and then secure it with zip ties. We used a zip tie at the top, bottom, and each side of the wreath. Make sure to pull them tight so that it’s secure enough to hold the pumpkins inside.
- Attach the premade bow with the twist tie that’s on the back of the bow.
- Lastly, we are going to place the pumpkin patch sign. Since this isn’t really wood, you can easily cut the top part off with scissors. Once you have removed the top, use a dab of hot glue to secure it to the back of the wire wreath form.
Notes
If you can’t find the pumpkin patch sign at your local Dollar Tree, you can always use another fall sign. Amazon has a variety of different ones you can use.
Sometimes the mini pumpkins come in a bag or on a skewer. You can use the ones on the skewers, just slide them off the skewer before use. You can also change up the pumpkins to create your own unique look for the wreath.